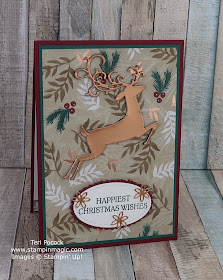
More today using the glorious Dashing Deer stamp set and coordinating Detailed Deer thinlits dies!
These were super quick cards to create. Originally I was going to create the three cards using the three different colours of Glimmer paper in the Joyous Noel 6" stack ..... but I changed my mind and went for three different textures in the end ..... I still might do more using the Glimmer yet, because they were so quick to do :o)
Also .... just in case you don't know .... our new Glimmer paper is much easier to die cut these days. It no longer has that plastic backing on it that you have to peel away before die cutting. It now cuts like a dream! :o)
The cards are identical apart from the Deer. This is such a beautiful shaped die to use.
I wanted extra dimension for the deer but decided not to use Dimensionals to back them because of the fiddly antlers. Instead I cut extra black Deer to back them with. I also added Multipurpose Adhesive sheets to them so they were super easy to stack together.
The paper used for this Deer and for all the backgrounds is from the Joyous Noel Specialty Designer Series paper. This paper is beautiful and has Copper Foil accents. I cut four extra Black Deer to stack behind this one, but only cut three for each of the other cards. I thought the paper might need that extra one because it's thinner than the Glimmer and the Foil.
Of course the Copper Foil looks beautiful and goes with the paper so nicely.
I know you can see the little bumps created by the ejection holes on the die cut, but to be honest that has never bothered me. I think there is a way to stop these showing - maybe layering with copy paper before cutting (not sure). I'll have a play and let you know what I find out - I know some people don't like seeing the litte 'bumps' :o)
I know you can see the little bumps created by the ejection holes on the die cut, but to be honest that has never bothered me. I think there is a way to stop these showing - maybe layering with copy paper before cutting (not sure). I'll have a play and let you know what I find out - I know some people don't like seeing the litte 'bumps' :o)
Shop With Me Online - 24/7
Join My Team
Find Me On Facebook
Follow Me On Pinterest
Supplies Used
If you are in Europe (UK, DE, FR, NL or AT ) you can purchase any of the products below through me in my Online Store. Click on any of the links to take you directly to that item.
Join My Team
Find Me On Facebook
Follow Me On Pinterest
Supplies Used
If you are in Europe (UK, DE, FR, NL or AT ) you can purchase any of the products below through me in my Online Store. Click on any of the links to take you directly to that item.


No comments:
Post a Comment
Thank you for taking the time to leave a comment. I really appreciate it :) Teri xxx