Video Tutorials

Friday, 29 March 2019

Inlaid Embossing Technique - Using Flourish Thinlits Dies - Video Tutorial


Today's Video shows you how to do the Inlaid Embossing Technique.

I used it with the Flourish Thinlits Dies for the background on these cards.


This is such a simple Technique to do. You die cut or punch out your shapes and lay them onto a mat before running it through the Big Shot with an Embossing Folder. 

I chose to use the Tufted Dynamic folder, but you could use almost any. The die cut or punched shapes meld with the card layer and look like one - it's very effective!


I created this card using the same colours as the first, but reversed them :o) Unfortunately I stamped the sentiment too close to the edge of my card and couldn't use the Stitched Label framelit to cut it out, so chose a Stitched Oval instead.


This is the card I created in the Video. I changed the colours around again but still used the 2017 - 2019 In Colours. 


I stamped the sentiment using the Stamparatus. I did this because I wanted to overstamp it using Versamark ink and emboss using Clear Powder. I love the dimension you get with this - and you can create any colour of 'embossing' using this simple technique :o)

Here is the Video ...


Measurements


Tranquil Tide card base                                  ½ an A4 standard sheet of card          
                                                                                                           (US 8½" x 11")


Whisper White mat                                       14.4cm x 10cm        (US 5¼" x 4")
for inside the card

Silver Foil                                                        14.3cm x 9.9cm       (US 5⅛" x 3")


Berry Burst                                                     13.9cm x 9.5cm       (US 5" x 3¾" )


You will also need some more Whisper White card for stamping on and more Tranquil Tide card for your die cuts.


Shop With Me Online - 24/7

Join My Team

Find Me On Facebook

Follow Me On Pinterest

Subscribe To My YouTube Channel

Supplies Used

If you are in Europe (UK, DE, FR, NL or AT ) you can purchase any of the products below through me in my Online Store. Click on any of the links to take you directly to that item.


Wednesday, 27 March 2019

Another No Stamping Card - With The Flourish Thinlits Dies


I have another 'no stamping' card to share with you today. I'm still trying to build my stack of masculine cards and I think I can add this one to it :o) 

The background paper I used is from the Nature's Poem paper pack. I took the colours from this pack too - I don't think I would ever have come up with this combination myself otherwise!

The card base and sentiment are Blackberry Bliss - it's difficult to see this in the photo. 

The Vanilla circle was cut using one of the Stitched Shapes framelits and embossed using the Subtle Dynamic embossing folder.


I love to stack these sentiment die-cuts and cut four. The card was already backed with some of our Multi Purpose Adhesive Sheet. This makes it very quick and clean to stack them ... no sticky fingers! :o)


Shop With Me Online - 24/7

Join My Team

Find Me On Facebook

Follow Me On Pinterest

Subscribe To My YouTube Channel

Supplies Used

If you are in Europe (UK, DE, FR, NL or AT ) you can purchase any of the products below through me in my Online Store. Click on any of the links to take you directly to that item.


Monday, 25 March 2019

No Stamping Card - Flourish Thinlits Dies


Hey There! :o)

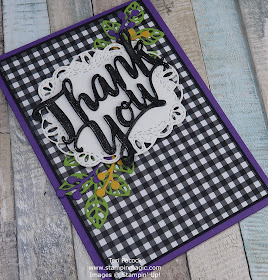
Today's card was created just with die cuts - no stamping at all. 

The Flourish Thinlits are gorgeous, but sadly I just haven't reached for them much - too much other gorgeousness to tempt me! They coordinate with the Flourishing Phrases stamp set.

All change for today though, I pulled these out first to use on my card. I then decided to not to use any stamps at all and pulled out the lovely Thank You thinlits die. 

I cut four of the Thank Yous from Basic Black card backed with some of our Multi-Purpose Adhesive Sheets - I like to stack this die :o) I did cover it with the Clear Wink of Stella pen but this didn't give me enough shine, so I then covered the top layer with Versamark ink and heat embossed using Clear Powder.


The background paper is from the Botanical Butterfly Sale-a-Bration paper pack.


Shop With Me Online - 24/7

Join My Team

Find Me On Facebook

Follow Me On Pinterest

Subscribe To My YouTube Channel

Supplies Used

If you are in Europe (UK, DE, FR, NL or AT ) you can purchase any of the products below through me in my Online Store. Click on any of the links to take you directly to that item.