Video Tutorials

Friday, 31 January 2020

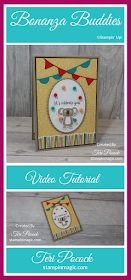
Bonanza Buddies - Juggling Koala Bear - Video Tutorial


I have a very quick Video tutorial to share with you today showing how I created this super cute Juggling Koala Bear card.

The new Assorted Pom Poms are just adorable ... and such fun to incorporate into a project! You get 4 different colours in the pack, but I didn't use the White ones today - they wouldn't have shown up against the Whisper White Oval.


The Koala was stamped with Crumb Cake ink and his face was added in Early Espresso ink.

The papers are from the Birthday Bonanza Designer Series paper pack.

If you use 8½” x 11” as your standard card make sure you place your Banners a little higher up on the top of the card, you won't have as much room as A4 users have :o)

Here is the Video ...


Measurements

Note: If you use A4 as your standard sheet of card – follow the metric measurements (cms).
If you use 8½” x 11” as your standard sheet of card – follow the imperial measurements (inches).

Crumb Cake card base                            ½ an A4 standard sheet of card          
                                                                                                 (US 8½”x 11”)

Whisper White (inside)                           14.4cm x 10cm     (US 5¼” x 4)

Early Espresso                                         14.4cm x 10cm      (US 5¼” x 4”) 
Birthday Bonanza DSP                           14cm x 9.6cm        (US 5” x 3)
Birthday Bonanza Candle DSP               9.6cm x 2cm         (US 3x ¾”) approx.


You will need some White card for stamping and die-cutting and Crumb Cake, Bermuda Bay and Poppy Parade card for die-cutting.


Shop With Me Online - 24/7

Join My Team

Find Me On Facebook

Follow Me On Pinterest

Subscribe To My YouTube Channel

Supplies Used

If you are in Europe (UK, DE, FR, NL or AT ) you can purchase any of the products below through me in my Online Store. Click on any of the links to take you directly to that item.


Wednesday, 29 January 2020

Painted Poppies - Three Thank You Cards


My Painted Poppies stamp set finally arrived ... and I couldn't wait to play. I couldn't decide what to make, so ended up with three cards because I wanted to try several things :o)

All the cards are very quick and simple to make. I only used the Flower heads and the flower background stamp for the front of each card.


The colour used for this first card is Crushed Curry.
The black ink I used throughout is Versafine Onyx Black. I stamped it and then heat embossed using Clear powder.


The stamp set doesn't contain any sentiments but there is another bundle in the suite where the stamp set only contains sentiments - I haven't got this. The sentiment used comes from the Butterfly Gala stamp set.

I stamped the smaller flower head all over the sentiment mat in the coloured ink before stamping and embossing the sentiment on top.

The Basic Black mat under the sentiment was also stamped with the smaller flower head in Versafine ink and heat embossed with Clear powder. This looks lovely. You cannot see it in the photos, but in real life, it adds so much to each card.


I had originally planned to add some Flowers to the front of the card with Dimensionals, but preferred it without so the Flowers were added to the inside of the card. I ended up decorating the inside of each card a little differently.


This second card is in Pumpkin Pie. I wanted all the cards to have a similar look, but be different so chose a Portrait orientation and only stamped the Flowers in two corners.


The sentiment panels were created in exactly the same way for each card - just using a different coloured ink.


I don't often stamp inside a card, usually, I just decorate them with a strip of contrasting paper. It was fun doing something different.


This is my favourite of the three. I used Terracotta Tile ink this time. 

I did struggle a little deciding whether or not to add the paper panel, the card looked great without it ... I almost made two! :o)


The paper is from the 2019/2021 In Colour 6" paper stack.


You can see my embossing quite clearly here. I was only planning to emboss the Black originally but the first time I did it the background ink was still a little wet and grabbed some of the powder. When I heat set it, I thought it looked lovely so did the same thing for all the flowers.


Shop With Me Online - 24/7

Join My Team

Find Me On Facebook

Follow Me On Pinterest

Subscribe To My YouTube Channel

Supplies Used

If you are in Europe (UK, DE, FR, NL or AT ) you can purchase any of the products below through me in my Online Store. Click on any of the links to take you directly to that item.