Wednesday, 30 September 2020

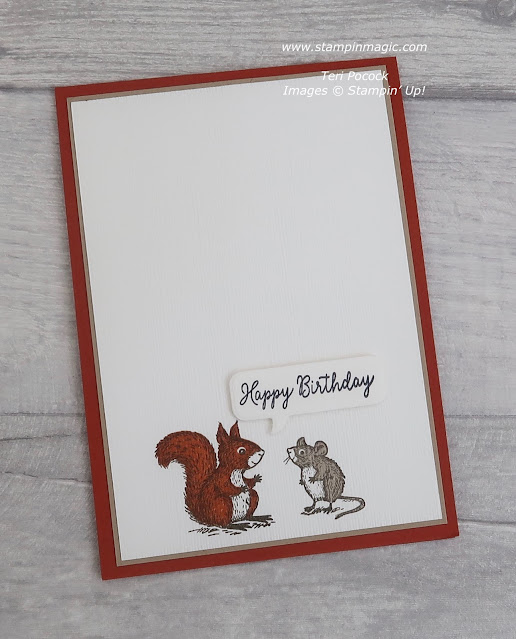
Special Someone - Birthday


Here is a very sweet 'masculine' card for a Birthday. Of course it could really be given to anyone, but I will use it for one of my brothers :o)

I used the adorable Special Someone stamp set and coordinating Special Day dies. 

The stamp set is a 2-step set. You stamp the detail image and then there is a block stamp you use to 'colour' the image with. Super easy to do with Photopolymer sets.


I did emboss the main Whisper White panel using the Subtle folder and it looks fab, but I couldn't get it to show properly in the photos - one day I'll find out how to take 'good' photos! :o)


Shop With Me Online - 24/7

Join My Team

Find Me On Facebook

Follow Me On Pinterest

Subscribe To My YouTube Channel

Supplies Used

If you are in Europe (UK, DE, FR, NL or AT ) you can purchase any of the products below through me in my Online Store. Click on any of the links to take you directly to that item. 


Monday, 28 September 2020

Christmas Gleaming - 8" Fold Flat Gift Bag - Video Tutorial


In today's Video I show you how to create another Fold Flat Gift Bag. This is a larger one than you have seen from me before. It measures 8" wide and high and 3" deep.

I used the Christmas Gleaming stamp set for the images and sentiment and papers from the Pointsettia Place Designer Series Paper pack.

The Holly and Berries were stamped using Memento Tuxedo Black ink and coloured using the Stampin' Blends Alcohol markers. These were cut out by hand.


I love Fold Flat Gift Bags, they are so much easier to store until you actually need them.

Here is the Video ...


Measurements

Poinsettia Place DSP     - FRONT & SIDE              11½” x 11”


With the LONG side across the top - Score at:    3” and 11”


Quarter turn CLOCKWISE so the SHORT side at top –

                                                               Score at:    3” and at

                                                                                  4½” to the 1st Score Line

Turn Back so the LONG SIDE is across the top – 

                                                               Score at:    1½” to the 1st Score Line


Poinsettia Place DSP     - BACK & SIDE                11½” x 11”


With the LONG side across the top - Score at:    3” and 11”


Quarter turn CLOCKWISE so the SHORT side at top –

                                                               Score at:    3” and 4½”


Turn Back so the LONG SIDE is across the top – 

                                                               Score at:    1½” to the 1st Score Line


Don’t forget to score the TRIANGLE sections on the SIDES!


Crumb Cake – Handles x 2                                    11” x ½”     (29.7cm x 1.3cm)

Real Red – Front Panel                                           8” x 2”     (20.3cm x 6.1cm)

Poinsettia Place DSP                                              8” x 2¼”     (20.3cm x 5.8cm)


You will need extra Whisper White and Real Red card to complete this project.


Shop With Me Online - 24/7

Join My Team

Find Me On Facebook

Follow Me On Pinterest

Subscribe To My YouTube Channel

Supplies Used

If you are in Europe (UK, DE, FR, NL or AT ) you can purchase any of the products below through me in my Online Store. Click on any of the links to take you directly to that item. 


Friday, 25 September 2020

Prized Peony - 5" x 7" Card Box - Video Tutorial


I'm sharing another Video with you today. This time it shows you how to create a different size Card Box. This one will hold a 5" x 7" card.

This isn't a size I make that often but it is one of our standard sizes and is very popular :o)


I used the Prized Peony stamp set again to decorate it. The idea was just to create a box to hold the Shaped Easel Card I created in my last Video (HERE) - but I ended up making another one too :o)


The main colour used here was Seaside Spray ... and I made a 'normal' side-opening rectangular card this time but kept the layout the same as for my Shaped Easel card.


Here is the Box and card together. This card is actually smaller than 5" x 7" but it's bigger than a standard card, so the Box is fine for it.

You can find the details for the card HERE.


The colour used for this one was Rococo Rose.

Here is the Video ...


Measurements

Rococo Rose – Base                                                   8” x 6   

Thick Whisper White – Lid                                        8 3/16” x 6 3/16”


Score the Base and Lid at ½” on ALL sides                 


Ribbon approx..                                                          11” (28cm)


You will also need additional Whisper White and Rococo Rose card to complete this project.


If you are in Europe (UK, DE, FR, NL or AT ) you can purchase any of the products below through me in my Online Store. Click on any of the links to take you directly to that item.